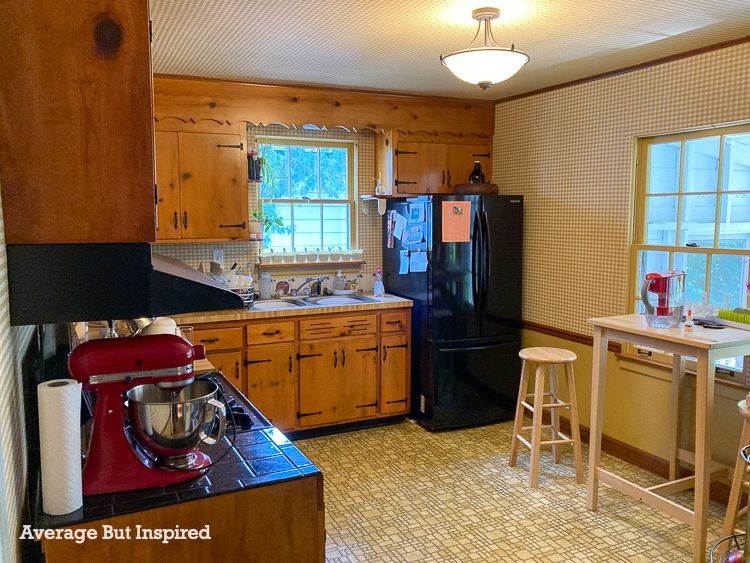
• Skip to primary navigation
  • Skip to main content
  • Skip to primary sidebar
Average But Inspired logo - DIY and craft

Average But Inspired

Craft a home you love. DIY and craft tutorials.

  • About
    • Contact Me
    • Disclosures
    • Privacy Policy and Copyright Policy
  • DIY
    • Furniture
  • Crafts
    • Dollar Store Crafts
    • Seasonal
      • Patriotic & Summer
      • Valentine’s Day
      • Easter & Spring
      • Fall & Halloween
      • Christmas & Winter
  • Home Decor
    • Organization
  • Shop
    • DIY Swag
    • DIY Guides
  • Home

DIY

How to Paint a Tub with Rustoleum Tub Paint (& What NOT to Do!)

July 6, 2021 by Bre 71 Comments

I’m in the middle of a modern vintage bathroom makeover, part of which included refinishing the almond-but-once-avocado-green bath tub.  Refinishing the tub made it look BRAND NEW, but the project was not without its challenges! I’m going to show you how to paint a tub with Rustoleum Tub and Tile, an epoxy tub paint, and give you tips to make your project as smooth as possible.

If you have a chipping, fading, or just plain ugly tub, here's the fix! Learn how to paint a tub in this post! She used the Rustoleum Tub and Tile Kit to get a brand new look.

The Bath Tub Before Refinishing

The bath tub had already been reglazed or refinished at some point in the past.  I guess the owners decided that avocado green was no longer their style!  Unfortunately for us, that finish had started wearing off, leaving the tub with a very ugly, splotchy appearance.

Before painting this tub with the Rustoleum Tub and Tile Kit, this almond bath tub had been reglazed. It was previously avocado green.

This post contains affiliate links.  To read my full disclosure policy, please click here.

The original green tub finish was appearing on the inside more with every day that passed.  Everything about this bath tub looked dirty.  I decided to paint the tub with the Rustoleum Tub and Tile Kit to see if I could improve it, and figured I would hire a pro to refinish it if I failed.

Spoiler alert: with some bumps along the road, it ended up turning out beautifully!  I’m so glad I can share my experience and instructions for how to paint a tub with you – I really think it will help!

Things to Consider Before Painting a Tub Yourself

Before you jump right in and start painting your tub, there are a few things you should consider.

First, the Rustoleum Tub and Tile Kit has terrible instructions.  I was amazed at how inadequate they are.  They do have a somewhat helpful video about repainting a tub, but otherwise the instructions are just bad.  Reading blog posts like this and customer reviews on sites like Amazon and Home Depot may be very helpful to you.

See how this blogger used the Rustoleum Tub and Tile Refinishing Kit to give her almond bath tub a fresh white paint job!

Next, you need to consider the timing of this project in terms of weather conditions and your availability.  With respect to weather, you must do this project when the weather is good: not too hot and not too cold.  I explain that later in this post (in the “Ventilate the Bathroom” section).

As for your availability, each step of the tub painting process needs to happen within specific timeframes, and there is a three-day period once you finish painting where you can’t use the tub.  You’ll need to plan out how you can accomplish the painting and the waiting period so that this doesn’t happen when you have a house full of guests arriving and no tub available.

Finally, understand that there is more cost involved than just one painting kit.  Rustoleum makes it seem like you buy one kit and you have a brand new tub, but it doesn’t work quite like that.  As I explain later in this post, I needed two Tub and Tile Kits.  I also purchased primer and then all of the supplies like paint brushes, etc.  I still came out way ahead of having someone else paint the tub for me, but it was more expensive than the cost of one paint kit.

Click to view any of the posts in this series!

  • Vintage Modern Bathroom Makeover Plans
  • How to Paint a Bath Tub
  • How to Paint Bath Fixtures with a Lasting Finish
  • DIY Polka Dot Accent Wall
  • Modern Vintage Bathroom Makeover Reveal

Supplies Needed to Prep a Tub for Painting

Now that you know a bit more about what to expect when painting a tub, let’s talk about what you need to thoroughly prep the bath tub.  These are the supplies I used to get the tub ready to be painted:

  • Comet powder cleaner
  • Lime-A-Way cleaner
  • ScotchBrite Heavy Duty Scour Pads
  • Caulk remover tool (or utility knife)
  • 400 grit wet/dry sandpaper
  • Tack cloth
  • Rubber gloves, mask, protective eyewear
  • Optional: vacuum

How to Prepare a Tub for Painting

For this project, I did all of the prep work the night before I planned to paint the tub.  It took around two hours to complete this portion of the project.  The reason I prepped the night before was to ensure that the tub would have enough time to completely dry before priming and painting.

Clean with Comet

I started by giving the tub the best cleaning it’s ever gotten.  I scrubbed it like crazy with Comet powder cleaner, and then rinsed all of the nastiness down the drain.

Remove the Caulk

Next, I used a caulk remover tool to take out as much of the caulk around the tub as I could.  I didn’t do a perfect job, but I got most of the old caulk out.

Before painting a bath tub, you must remove all of the old caulk.

This was a harder job than I expected!  Once I finished with this part, I used a little industrial vacuum to suck up all of the caulk bits.

Clean with Lime-A-Way

We have well water and a whole ‘lotta minerals in our water, so I made sure to do a second sweep with Lime-A-Way.  I sprayed it on, let it sit for five minutes, and then scrubbed the tub again.  It looked so clean I couldn’t believe it!

Even if you don’t have a lot of minerals in your water, a second cleaning is a really good idea.  You need the tub to be spotless when you paint it.  Any residue left on the tub will cause adhesion issues with the paint, so cleaning is key!

Sand the Tub

I wiped down the tub with a towel, and then sanded the entire thing with 400 grit wet or dry sandpaper.  400 grit sandpaper is a very fine grit sandpaper, and it helps to slightly rough up the surface before painting (giving it something to hold onto), and also to remove any flaking paint from a previous refinishing job.

Remove the Dust

Finally, the last tub painting preparation step is removing the dust.  I washed everything down the drain, dried the tub, and then went over it with tack cloth to get any fine particles that were left.

Part of the preparation for painting a bath tub is sanding the tub with 400 grit sandpaper, and then removing all of the dust with tack cloth.

Once I finished this, I let the tub dry overnight and poured myself a nice glass of wine.  (Okay, maybe two glasses.)

Supplies Needed to Paint a Bath Tub

The next day I was ready to paint the tub and begin the beautification process!  Here are the supplies I used:

  • Tub Cast primer (NOTE: As of April 2024 it does not seem that this product is being made anymore! BUT, it is an optional step so it won’t kill your project that you can’t get it.)
  • Rustoleum Tub and Tile Kit (NOTE: get two kits. You will probably need to use two.  If you end up only needing one, you can return the other.)
  • 4″ foam rollers (at least 4)
  • 4″ roller tray
  • 2″ foam brushes (at least 4)
  • Painters tape
  • Microfiber cloth
  • Stir sticks
  • Paper towels
  • Drop cloths
  • Disposable gloves, mask, protective eyewear
  • Recommended: air purifier and fans
  • Tub caulk

How to Paint a Tub

As I mentioned above, the timing of this project is really important in terms of both weather (don’t do it when you can’t have the windows open) and product application (each coat needs to be applied within a certain timeframe).  So keep that in mind if you decide to do this yourself!

Ventilate the Bathroom

The biggest drawback of this tub and tile paint is the terrible smell.  Think of an awful smell and multiply that by ten.  It’s really bad.

I highly recommend doing this job in a window of time where you can have the windows in the bathroom and the rest of the house open for at least two days.  Do not attempt it in the middle of winter or the dead of summer.  Please.

Also, make sure to have a fan going and wear a ventilator or N95 mask.

If you can swing it, consider using an air purifier while painting a tub, too.  I was gifted this Mi Air Purifier 3C and have loved using it during this bathroom makeover.  The carbon filter helps remove odors, and the HEPA filter removes 99% of pollutants in the air (including bacteria and viruses).  An air purifier pulls double duty because when I’m not using it for my DIY projects, it’s amazing for my daughter who has terrible seasonal allergies.

Apply the Primer

Tape off around the edges of the tub with quality painters tape so you don’t accidentally get paint where you don’t want it.

Then, apply a coat of wipe on TubCast primer with a microfiber cloth.  The Rustoleum Tub and Tile Kit does not come with primer and it does not say that you need to use primer.  I have painted enough tricky surfaces in my day to feel like primer is a must have, so I researched and found this product, which has been tested with Rustoleum Tub and Tile paint.  You can skip this step if you just want to apply the Rustoleum epoxy tub paint alone.

(NOTE: as mentioned in the supply list, it appears that this tub primer product is no longer available as of April 2024. I do not have a recommendation for an alternate primer – I’m sorry!)

Before painting her bath tub, this blogger used Tub Cast bonding primer. She used it underneath the Rustoleum Tub and Tile Kit paint.

If you do apply the TubCast primer, it only takes twenty minutes to be ready for topcoating, so you don’t have to wait long at all!  You just wipe it on – it’s not even like paint.

Mix the Rustoleum Tub and Tile Paint

Once the primer is dry (if you chose to do that step), it’s time to mix the Rustoleum Tub and Tile Paint components.  You will mix Part A and Part B for two minutes each, and then pour Part A into the Part B container, and continue mixing for two minutes.

See how this blogger painted her bath tub with the Rustoleum Tub and Tile Kit.

On the package instructions it says that there is no need to wait to use the paint once it’s been mixed.  However, my experience was that the paint, as mixed, was extremely runny at the top of the paint can – almost like really thin milk – and that the runny part at the top would not blend with the thicker paint at the bottom of the can.

Apply Two Coats of Rustoleum Tub and Tile Paint

So, for the first coat of tub paint that I applied, it was practically transparent and – to be frank – awful.  It was very runny and streaked all down the sides of the tub.  I worked quickly with the foam roller to smooth out streaks and do the best I could.

This blogger painted her bath tub with the Rustoleum Tub and Tile Kit. The first coat of paint went on very thin and provided hardly any coverage at all.
First coat of Rustoleum Tub and Tile paint

The instructions said the second coat needed to be applied within six hours, so I left the first coat and the rest of the paint in the can, and took a two-hour break to pick up my son at camp and eat lunch.  When I came back, the paint seemed to have thickened in the can, so I was hopeful that the second coat would apply thicker.

Indeed, it did!  The second coat was much more opaque and provided more coverage than the first coat of paint on the tub.  I again applied small parts of paint in the corners of the tub with the foam brush, and rolled the rest of the tub.  The paint self-leveled nicely and I did not have an issue with streaks, drips, or runs with the second coat of paint.

The second coat of Rustoleum Tub and Tile paint went on thicker, but was insufficient to be finished.
Second coat of Rustoleum Tub and Tile paint

Apply a Third Coat of Tub and Tile Paint

Because the first coat of paint was so thin, it was clear that I needed a third coat of paint on the tub.  Because the paint, as mixed, has to be used within six hours, I had to use a second Tub and Tile Kit on the next day to get a third coat of paint.

Learning from the runny paint experience the day before (or so I thought), I mixed the paint per the package directions and let it sit in the can for about 1.5 hours.  When I came back to get to work, it still seemed runny to me at the top, so I poured about half of the paint into a disposable plastic cup and set it aside on the vanity.

I then used the thicker paint that was at the bottom of the can to apply the third coat of paint to the tub.  As with the day before, it went on nice and thick, and the third coat gave me the coverage I needed.

It took three coats of Rustoleum Tub and Tile paint to get a solid finish on this painted bath tub.
Third coat of paint is visible on the right side of the tub. The left side of the tub only has two coats of paint.

When I finished painting the tub, I got up and could not believe my eyes: tub and tile paint was all over the granite countertop, in the sink, and running down the front of the vanity I’d just painted.  The epoxy paint had EATEN THROUGH THE CUP and gone EVERYWHERE.  It was a disaster and I freaked out.

Do not pour mixed Rustoleum Tub and Tile paint into a plastic cup. The epoxy paint ate through this cup and spread everywhere, making a mess in this blogger's bathroom.

Thankfully my husband was home, and he heard me screaming so he ran in to help.  We got most of the epoxy off of the granite and floors.   I had to repaint the vanity and order new hardware, but it could have been much worse!  Moral of the story: do not transfer this paint to any other container.  It is extremely caustic!  I really think Rustoleum needs to add this as a warning to its product information.  This was a terrible experience!

Remove the Painters Tape

I was traumatized from the “epoxy on everything” experience, so I forgot to remove the painters tape from around the tub within an hour of applying the last coat.

I removed it about six hours later, and it was fine. Phew!

Caulk Around the Tub

The next day, once the paint was totally dry, I caulked all around the tub with DAP Kwik Seal Plus tub caulk.  This made a perfect transition between the tub and tile, and tub and wall, and was the cherry on top of the tub paint job.

Let the Tub Paint Cure for Three Days

Finally, I let that tub paint cure and harden for at least three days.  There was no way I was going to ruin this beautiful paint job after all the hard work and tears that went into it!  As Tom Petty says, “the waiting is the hardest part” and that is true! Sharing a tiny bathroom with my kids while this paint was curing wasn’t the most fun, but it was worth it!

In the waiting period, I spray painted the tub fixtures (I will have a tutorial on that soon), to freshen up this bathroom even more!

The DIY Painted Bath Tub

In the end, the results of this project exceeded my expectations! (You can see how I spray painted the faucet and the tub/shower fixtures, too!)

Learn how to paint a tub and get a professional-looking finish with the Rustoleum Tub and Tile Kit! This painted bath tub looks brand new!

This bath tub looks BRAND NEW.  Really.  I’m not just saying that because it was a tricky project.

Learn how to paint a tub and get a professional-looking finish with the Rustoleum Tub and Tile Kit! This painted bath tub looks brand new!

I saved around $200 doing it myself, and absolutely love the results.  The kids have been using it for about three weeks now, and there are no signs of chipping or flaking.

I’m optimistic that with gentle cleaning, this painted tub finish will last for several years.

Learn how to paint a tub and get a professional-looking finish with the Rustoleum Tub and Tile Kit! This painted bath tub looks brand new!

If you’re scared to paint your tub, I totally get it.  Think about this: what’s the worst that can happen?  I think the worst thing happened to me (paint everywhere!), but you won’t make that mistake because I filled you in!  You can do this – give your tub a brand new life and look.  You’ll be so happy you did!

Filed Under: DIY

5 Ideas for Leftover Paint Samples

June 3, 2021 by Bre 2 Comments

If you have leftover paint samples and are wondering what to do with them, check out this post for great ideas!

It took me several paint color selection fails to finally learn that buying paint samples before painting an entire space is definitely worth it!  I can attest to the fact that many color disasters have been avoided this way.  But with all of those little paint jars comes the after-the-fact question of what to do with leftover paint samples?  Here are 5 ideas for leftover paint samples that will have you even happier you bought them in the first place!

If you have leftover paint samples, read this post to get great ideas of ways to use up sample paint pots!

1.  Donate Sample Paint Pots

If you don’t want the clutter associated with keeping sample paint containers, donate them!

Some organizations will accept donations of sample paint pots.  Certain Habitat For Humanity ReStore locations collect latex paint and recycle it into new paint colors offered for sale to the public.  Before heading out to any donation spot, make sure to check their requirements first.

School art departments may also be grateful for your donations of paint sample pots.  Check with the teachers or administrators first.

And finally, neighbors, friends, or people in your Facebook resale group may want the paint samples!  I am always amazed how people would scoop up paint sample pots from me when I’d list them in my old town’s Facebook group.  This was an incredibly easy way to get rid of paint samples and do good for others.

2.  Make Chalk Paint with Leftover Paint Samples

Another great idea for sample paint is to turn it into chalk paint!  (In case you don’t know what chalk paint is, it’s thick, fast-drying paint that doesn’t require you to sand or prime before use.  Check out my post on how to update cherry furniture with information on when you might want to prime a piece before chalk painting it.)

Did you know that you can make your own chalk paint?  It’s really easy!  Here’s my favorite recipe for homemade chalk paint:

  • I cup of paint
  • 2 tablespoons of calcium carbonate powder
  • 1 tablespoon of water

Watch my TikTok video to see how easy the process of making your own chalk paint is!

Mix well and apply! I refinished this two-tone dresser with homemade chalk paint.

3.  Paint an Accent Wall with Sample Paint 

Patterned accent walls and handpainted “wallpaper” are a huge trend in decor currently.  It’s not surprising as these accent walls are an easy way to add some personality to a space, they don’t take a lot of time to do, and they’re inexpensive as compared to the cost of some wallpapers.

Painting an accent wall with leftover paint samples is a brilliant use of these paint pots!  I painted a grid accent wall in my foyer with craft paint, but this same project easily could have been done with paint samples.

Use leftover paint samples to paint a patterned accent wall in your home.

There are so many patterns you can paint on a wall with paint samples: dots, stripes, crosses, sponge painted shapes, arches . . . the list goes on and on!

4.  Create DIY Art with Leftover Paint

As I say over and over and over again, art is so expensive!  I wish I could have “real” artwork for my home, but I’ve got too many other things to spend money on.  Because of that, I like to make my own artwork, and it’s totally doable with leftover paint!

Use leftover paint samples to create art for your home!

Update a thrift store painting with paint samples, or create new artwork with paint samples and fancy wrapping paper.  Those are two easy ways to get custom art without any talent – ha!

5.  Update Home Decor with Paint Samples

Finally, a perfect idea for using up paint samples is to update home decor with them.  These tiny pots of paint give you just the right amount to try things like painting a mirror frame to give it a new look, giving baskets a fresh new color with paint, or even painting a lampshade like I did in my son’s bedroom makeover!

Using up sample paint pots is a great way to save money and it’s also better for the environment than pouring it down the drain (don’t ever do that!).  Let me know if you have any other great ideas of ways to use leftover paint samples in the comments below.

-Bre

Filed Under: DIY

My DIY Kitchen Makeover Reveal!

May 5, 2021 by Bre 28 Comments

blank

Seven months.  SEVEN MONTHS! That’s how long my DIY Kitchen Makeover took from start to finish.

Last year I painted my oak kitchen cabinets and did a whole bunch of other stuff to update my 1990s oak kitchen (I’ll walk you down that memory lane later in this post). 

Once those projects were completed, I outsourced things like electrical, countertops, and tile work, serving as my own general contractor/project manager.  Also more on that later in this post.

But now the second phase of my kitchen remodel without a renovation is complete, and I am so glad this project is finished.  (*Almost complete.  More on that later, too!)

Check out the DIY Kitchen Makeover this blogger gave her 1990s-style kitchen! Complete with painted cabinets, a clever disguise to the soffits, and much more, this kitchen feels like a whole new room - minus the expense of a gut renovation.

This post contains affiliate links.  To read my full disclosure policy, please click here.

The Kitchen Before: Golden Oak Cabinets, Brown Countertops, and Glass Mosaic Tile Backsplash

Any good reveal post is incomplete without the before photos!  So let’s have a flashback to what this kitchen looked like when we purchased the home in late 2019.

The BEFORE of this 1990s kitchen had oak cabinets, brown mosaic backsplash, and brown countertops.

The kitchen was in great condition, but it wasn’t really our style, so I set out to make it look more like us in the late summer of 2020.  I got a crazy idea to paint the kitchen tile backsplash to tone down the look.  The painted tile held up great and gave me the calmer look I was after.

Kitchen Makeover Part 1: Disguised Soffits, Converted Kitchen Desk, and Painted Oak Cabinets

Then, in the fall of 2020, things really got moving in my 1990s-style kitchen.  

Kitchen Soffit Makeover

First, my husband and I gave the kitchen soffit a makeover, and attempted to help blend the soffit with the cabinets by adding lots of trim to them.  You can read more about that project and how to disguise a kitchen soffit in the post I wrote about it.

Kitchen Desk Conversion to Trash

Then, we converted the kitchen desk area to pull-out trash, which was a better use of that space for our family.  

DIY Painted Cabinets

Once those projects were finished, I got to work painting the oak cabinets.  I painted, and painted, and painted.  It took me weeks of work because I only had a little bit of time each day to devote to the project, but I got it done.

I painted the cabinets Hampshire Taupe by Benjamin Moore, and you can read more about my process for painting oak cabinets in that post.

blank

Save Thousands by Painting Your Cabinets Yourself!

Download DIY Cabinet Painting Pro and get:

  • Step-by-step instructions
  • Complete supply list & product recommendations
  • Workflow checklist
  • Confidence to do the job right
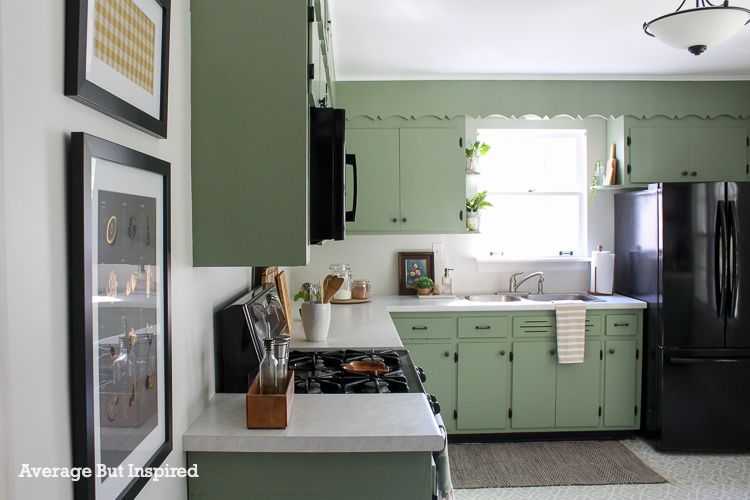
DOWNLOAD NOW

The first part of this DIY kitchen makeover made a huge difference in my family’s enjoyment of our home, and we were glad to celebrate Thanksgiving and Christmas in our refreshed kitchen!

In the first part of this DIY kitchen makeover, this blogger disguised her soffits with trim, painted the cabinets, and painted the backsplash. The second part of the makeover is even better!

Kitchen Makeover Part 2: New Electrical, New Tile Backsplash, and New Countertops

Once the New Year hit, it was time to get back to work on this kitchen makeover!  

Kitchen Remodel Electrical

First up, we had new LED recessed lighting installed in the ceiling, and we eliminated the large light fixture that once hung in an odd spot in the middle of the kitchen.  The recessed lighting added so much light to the kitchen – it was amazing!  The kitchen was very dark prior to this.

As part of this DIY kitchen makeover, she installed new LED recessed lighting.

We also swapped the can light over the kitchen sink for a cute little semi-flushmount light.  I wanted this change for cosmetic purposes only.  Since I have recessed lighting throughout the rest of the kitchen, I wanted there to be a cute light fixture somewhere.  

Previously I added wireless under cabinet lighting (you can read about it in that post), and I still loved it so I didn’t feel like adding the expense of hardwired under cabinet lights.

Painted Tile Backsplash Removal

Once we started shopping for countertops, it became clear to us that we were also going to need to replace our tile backsplash.  The painted tile backsplash was holding up great, but it would be damaged during the countertop removal and installation process.

Because of that, it made sense to rip it out before the new countertops went in, and replace with a new backsplash once the countertops were installed.

We did the tile backsplash removal ourselves, and honestly – it was a horrible job.  It was such a mess!  I’m sure there are better ways to remove a backsplash, but we did the best we could.  

As part of this DIY kitchen remodel, they ripped out their painted tile backsplash for a new one.

Once that was out, I hired drywall professionals to hang new drywall.  I’ve tried drywall in the past and it did not go well.  Ha!

Countertop Installation

At the beginning of March, our new quartz countertops, sink, and faucet were installed.  We chose MSI Blanca Statuarietto quartz because the creamy white shade with the subtle veining in browns, creams, and grays was perfect with the taupe cabinets.

As part of this DIY kitchen renovation, she installed new quartz countertops by MSI.

We also chose quartz because of its reputation for durability and ease of care.  I will be writing a post on my experience with quartz countertops so far because I think there’s a lot of false or misleading information out there about this product.  I love the look of these countertops in my kitchen, but I feel a bit deceived.

Check Out All of the Posts in This DIY Kitchen Makeover Series

  • How to Paint a Tile Backsplash
  • DIY Kitchen Soffit Makeover
  • How to Convert a Kitchen Desk to Pull-Out Trash
  • DIY Wireless Under Cabinet Lighting
  • DIY Painted Oak Cabinets
  • DIY Cabinet End Panels
  • DIY Kitchen Makeover Reveal

New Tile Backsplash Installation

Finally, in mid-April we were able to get our new backsplash installed!  Since everyone in the world is renovating right now, it was hard to find a professional who could do this job for us in a reasonable timeframe!  Thankfully we found a great company and they did amazing work.

As part of this DIY kitchen remodel, she installed a chevron tile backsplash.

I chose a very simple and inexpensive white rhombus ceramic tile, which we laid in a chevron pattern.  The second I saw this tile I knew it was what I wanted!

The grout, on the other hand, was a totally different story.  I could not, for the life of me, make a decision.  Choosing between white grout, off-white grout, brown grout, and more was making my head spin!  Thankfully my mom came with me one day to pick something.  I chose Laticrete Permacolor grout in River Rock.  It is slightly darker than the cabinet color, and really helps that chevron pattern pop!

A chevron tile backsplash with contrasting grout makes a statement in this kitchen.

I was nervous to pick something that would stand out, but in the end, it’s what made me happy so I went with it. I’m really glad I did because it gives my kitchen a little personality and doesn’t look like everything else on Pinterest.

DIY Kitchen Makeover Reveal

It feels so good to finally be FINISHED with this DIY kitchen makeover! 

A 1990s kitchen got a fresh new look in this DIY kitchen makeover remodel! Taupe painted cabinets, chevron tile backsplash, and quartz countertops made a huge difference!

Doing the work yourself and finding/managing professionals to help you with the parts you can’t (or don’t want to) do yourself is a lot!

A DIY kitchen remodel features painted cabinets, new tile backsplash, and a disguised soffit, among other things.

We have one issue left to resolve surrounding some scratches on our new quartz countertops, but once that’s taken care of with the installer, I will be glad to consider this project totally done!

MSI Blanca Statuarietto quartz countertops are perfect in this DIY kitchen remodel.

I hope this project shows you that you can update spaces in your home without a gut renovation. 

She turned a 1990s kitchen desk into pull out trash as part of this DIY kitchen remodel.

It may take you a lot of time, but you’ll get there eventually!  And when you do, you’ll be very proud of yourself!  And . . . you will have saved yourself a lot of money over a gut renovation or hiring out all of the steps.

Please let me know what you think of this makeover, and also let me know if you have any questions at all!  I’m always glad to help.


Filed Under: DIY, Reader Favorite

DIY Modern Planter {for Indoor or Outdoor Use!}

April 29, 2021 by Bre 4 Comments

blank

Pretty planters are a great way to add style to any space, but have you seen the price tag on the good-looking ones?  YIKES!  To save some cash and get a trendy look, why not make a DIY modern planter of your own?  I’ll show you how!

A current trend for indoor and outdoor planters is a handcrafted and timeworn look.  Think sculptural elements-like bowls, pedestals, and fluting-and natural materials like concrete and clay.  Not surprisingly, details like these add to the cost.

The good news is that we can definitely get the look for less (YES!!!), by using smart materials that let these modern planters work indoors or outdoors.

Learn how to make DIY modern planters for indoor or outdoor use with plastic bowls. It's an easy project and a great way to get that modern planter look without the hefty price tag.

Supplies Needed to Make a DIY Modern Planter

This post is sponsored by DAP Products, Inc.  The project and opinions are all my own.  Also, this post contains affiliate links.  To read my full disclosure policy, please click here.

  • RapidFuse Fast Curing Gel with Gel Control Applicator (check out the helpful “Where to Buy” button on the product page to find it in a store near you)
  • Optional: RapidFuse Plastic Primer Kit (in case the plastic you’re working with is proving difficult to bond, DAP makes this primer kit, which will solve that problem!)
  • Plastic serving bowls in a variety of sizes.  For each planter you will need two plastic bowls: one larger than the other.  I used this large plastic bowl, these medium plastic bowls, and this fluted serving bowl.
  • Masking tape
  • Electric drill
  • Plastic beaded necklaces
  • Gloves
  • Spray paint (I used a base color spray paint, stone finish spray paint, and matte finish spray sealer)
  • Multi-surface acrylic craft paint in gray
  • Artist paint brush

How to Make a DIY Modern Planter for Indoor or Outdoor Use

I feel like I say this a lot, but you’re not going to believe how EASY it is to turn plastic serving bowls into beautiful, modern planters.  You’re going to wish you did this sooner!

Step One: Drill Drainage Holes in the Plastic Bowls

Even those of us with the blackest thumbs know that drainage holes are a must in any planter.  Drilling through plastic can be tricky though – especially if it’s the hard plastic like my serving bowls are made of.  

To help drill through plastic without cracking it, put a piece of masking tape on the spot where you want to drill, and then put another piece on the opposite side.

To make modern bowl planters, drainage holes must be drilled.

Slowly drill through the tape with a small drill bit.  Once you’ve drilled a hole all the way through, slowly go through that hole with a larger drill bit to make the drainage hole bigger.

Making modern bowl pedestal planter is easy. To drill drainage holes, start with a small drill bit and work your way up in size.

Repeat this drilling process on the other bowl that you’re using for the planter, and make sure to drill in the same spot(s) as the first planter so that the holes line up and water can flow through from the top bowl to the bottom bowl.

Step Two: Glue the Bowls Together

To create the modern pedestal planter look, glue the bottoms of the bowls together.  For this step, it’s extremely important to use the right adhesive.  Otherwise your planters will look messy or quickly fall apart.

To make DIY modern planters, glue plastic bowls together with DAP RapidFuse Fast Curing Gel Adhesive. This glue has precise application and is safe for outdoor use.

RapidFuse Fast Curing Gel with Gel Control Applicator is exactly what you need.  Unlike many glues, RapidFuse Fast Curing Gel with Gel Control Applicator bonds plastic, has a controlled application that doesn’t run or squish out where you don’t want it, and it is safe for indoor or outdoor use.  That is KEY for these DIY modern planters! 

Flip one of the bowls over, and with gloves on, run a thin line of RapidFuse Fast Curing Gel with Gel Control Applicator around the bottom rim of the bowl. 

Run a band of DAP RapidFuse Fast Curing Gel Adhesive around the bottom edge of one of the bowls.

Then carefully press the bottom of the other bowl on top, making sure to line up the drainage holes you drilled in step one.

Press the two plastic bowls together, with the drainage holes aligned, to let the adhesive set and to create the shape of the. modern planter.

Gently apply pressure to the top bowl, pressing it onto the bottom bowl, and hold it in place for a few moments.  RapidFuse Fast Curing Gel with Gel Control Applicator sets up very quickly, so you don’t have to hold the bowl in place for long – just long enough to ensure that a bond has formed between the two bowls.  Once that happens, let the bowls sit for at least thirty minutes.

Step Three: Glue on Decorative Detailing

To up the style quotient on your DIY modern planter, consider adding some decorative detailing.  I used RapidFuse Fast Curing Gel with Gel Control Applicator to glue plastic bead necklaces around the middle of one planter, and around the top of the other.

And in case you’re wondering . . . no, I didn’t earn these necklaces at Mardi Gras.  Ha!

Add decorative details to the DIY modern planters. Here, a string of beads was glued on to add dimension.

Working one small section at a time, I ran a line of RapidFuse Fast Curing Gel with Gel Control Applicator along the bowl, pressed the beaded necklace down, and held it there for a couple of minutes until the glue set up. 

The precise applicator tip made this step very easy, as I didn’t have to contend with too much glue coming out.  The no-drip gel formula also made it clean and easy to apply these beads to a vertical surface!  Can you imagine doing this with regular glue?  No thanks.

A band of beads was glued to the top of the DIY modern planter in order to give it some dimension.

These beaded necklaces were great for adding consistent detailing, but if you prefer a more random look, you could use RapidFuse Fast Curing Gel with Gel Control Applicator to apply items like wood beads, buttons, dowels, and more.

Step Four: Paint the Planters

Once the adhesive has dried on the decorative details, it’s time to add the finishing touch to the DIY modern planter – the color. 

First, I sprayed the planters with two coats of spray paint formulated for use on plastic, and also for use indoors or outside.

Spray paint the DIY Modern Planters with spray paint that is safe for indoor and outdoor use.

After that layer of spray paint dried, I top coated the planters with a stone texture spray paint.  Again, I made sure that this spray paint works on plastic and that it was also good for both indoor and outdoor use.  (In this photo you can see that the stone texture has been applied to the planter on the left, while the planter on the right has not yet been top coated.)

Once the base coat of spray paint has dried, top coat the planters with stone texture spray paint. This will give the modern planters a concrete look.

To really make the fluted detailing and the beaded elements pop, I brushed on a light coat of soft gray multi-surface acrylic craft paint.  I was careful to touch just those raised areas in order to accentuate them a bit.

The stone texture spray paint with the added darkening of the raised details went a long way toward making these planters look like cement or natural clay.

After that paint dried, I sealed the planters with spray sealer in a matte finish.  This is important to make sure that the DIY planters’ finish will hold up if used outdoors.

Modern DIY Planters: The Finished Product

After filling them with potting soil and a beautiful sedum sod mix, these DIY Modern Planters are ready to be the star of my patio!  They’re going to look great paired with my DIY Glass Jar Lanterns, too!

These DIY Modern Planters were made with plastic serving bowls from the dollar store! Learn how to make these indoor OR outdoor modern planters in this post.

See how she made modern bowl planters with plastic serving bowls from the dollar store!

You would never guess that these beautiful indoor / outdoor planters are made from plastic serving bowls and Mardi Gras beads, would you?

Can you believe that these beautiful modern pedestal planters are DIY planters made from serving bowls? Get the full project tutorial in this post.

If you agree, I’d love for you to pin this post or share it with your friends.  And make sure to tag me and DAP Products on Instagram when you make this project!

How to Make a DIY Modern Planter for Indoor or Outdoor Use

How to Make a DIY Modern Planter for Indoor or Outdoor Use

Yield: 1
Prep Time: 5 minutes
Active Time: 1 hour
Additional Time: 1 hour
Total Time: 2 hours 5 minutes
Difficulty: Easy
Estimated Cost: $20

Learn to make a DIY modern planter that works inside or outside. Create a pedestal bowl planter with plastic serving bowls and embellishments.

Materials

  • RapidFuse Fast Curing Gel with Gel Control Applicator
  • Plastic serving bowls (two in different sizes)
  • Masking tape
  • Drill
  • Plastic beaded necklaces
  • Gloves
  • Spray paint (base color, stone texture, and sealer)
  • Multi-surface acrylic craft paint
  • Small paint brush

Instructions

  1. Drill drainage holes in the bottoms of each of the plastic bowls. Make sure to drill them in the same spot on each bowl so that the holes line up when the bowls are glued together.
  2. Run a thin band of RapidFuse Fast Curing Gel with Gel Control Applicator adhesive along the bottom of one of the plastic bowls.
  3. Press the other bowl onto the bowl with the adhesive, making sure line up the drainage holes, and hold the bowls together for a few moments until the adhesive sets up.
  4. Let the adhesive cure for 30 minutes.
  5. Use the RapidFuse Fast Curing Gel with Gel Control Applicator to attach a beaded necklace around the top or the middle of the planter. This will add detail and interest to the planter.
  6. Spray paint the planter with the base color spray paint. Let it dry, and repeat another layer of base color spray paint. Let it dry.
  7. Spray paint the planter with the stone texture spray paint. Let it dry.
  8. If desired, use multi-surface acrylic paint in a darker color to add highlights to the raised areas of the planter. Let the paint dry.
  9. Use spray sealer to protect the paint on the planters.
  10. Add soil and flowers or greenery and enjoy your DIY modern planter.

Notes

In order for this planter to be suitable for outdoor use, make sure to use the recommended adhesive, RapidFuse Fast Curing Gel with Gel Control Applicator, and spray paints that are indicated for outdoor use.

© Bre Eggert
Project Type: Home Decor / Category: DIY
blank


Filed Under: DIY, Homepage Crafts

Modernizing a Mirrored Wall: Tape to the Rescue!

April 15, 2021 by Bre 16 Comments

blank

Looking for a way to update a mirror wall? Don’t rip it out: try tape!

One of the biggest challenges in my Office and Guest Room Combo Makeover was modernizing a mirrored wall that screamed “hello, it’s 1980.”  OK, obviously it didn’t really scream that, but it might as well have!

Of course I thought about removing the mirrored wall altogether.  But when I researched how to do that, I decided it was too much work and that the wall repairs would be too expensive for what I wanted to spend at this time.

BEFORE: this mirrored wall was dated. See how she updated the mirrored wall for a fresh new look.

So then, for months, I brainstormed other creative ways to updated mirrored walls.  I had already updated mirrored bookcases with removable wallpaper, and antiqued a large plate glass wall mirror in my dining room . . . so what could I do here?

I considered covering the mirror wall in fabric, but knew I would not have good luck getting any pattern straight.  I also considered painting over the mirror, but I had slight concerns about the durability and look of that option.

Then, one night, I was cooking dinner and an idea popped into my mind: create a mirrored accent wall with tape!

I could see it in my brain, and it was the perfect solution!  I patted myself on the back for this stroke of originality and genius. 

Then I hopped on Pinterest and found out that this has been done before.  Among others, Caroline at Food52 added electrical tape grids to her mirrored closet doors, Chelsea at Making Manzanita also used black tape on mirrored closet doors, and Hometalk created a gold fretwork mirror with washi tape.  

Womp womp.  I am not a pioneer in adding tape to mirrored walls after all.

Despite that, I’m sharing this tutorial because it’s a huge part of my office and guest room makeover, and because IT LOOKS COOL!  🙂

Supplies Needed to Modernize a Mirrored Wall with Tape

This post contains affiliate links.  To read my full disclosure policy, please click here.

  • Mirrored wall or mirrored closet doors.  Really, any mirrored surface that you don’t want to be so “mirror-ey” anymore.
  • Black vinyl tape.  For this project I used 3/4″ vinyl pinstriping tape and 1/4″ vinyl pinstriping tape.
  • White or silver crayon
  • Level
  • Scissors
See how this full mirror wall got a fresh new look with tape!

How to Update a Mirrored Wall With Tape

First things first, I took down all of the artwork my kids had taped on the mirrors, and then I scrubbed it with Windex.  Even if you don’t have kid art tacked onto your mirrored wall, you should definitely clean it before starting.

Step One: Cover the Mirror Wall Frame with Tape

For this part of the project, I used the 3/4″ vinyl pinstriping tape because the frame around the mirrors was just about 3/4″ wide.

If you decide to do this project, measure the mirror frame before ordering tape.  You may need a different tape width than I used, depending on the width of your mirror frame.

Starting in the far left corner, I worked my way across the top of the mirror frame – covering it in the black vinyl tape. 

Modernizing a mirrored wall with tape: it can be done! Learn how to do it in this post.

Once I reached the end, I cut the tape, and then started a new piece to go down the right side of the mirror.  I repeated this process until the entire mirror frame was covered in black tape.

Step Two: Cover the Vertical Mirror Gaps with Tape

Then, I covered each of the vertical spaces between the mirror wall panels with the same black tape.

This is halfway through the mirror wall updating process! See how she modernized a mirror wall with tape.

The mirror was looking better already!

TIP: be careful not to pull or stretch the tape. It will shrink up with time if you pull it tightly.

Step Three: Create the Secondary Tape Lines

Now here’s where things get a little more interesting: creating the secondary tape line on the mirror.  First I tried measuring several inches down from the top tape line, drawing a straight line across, and then covering that line with tape.  It did not work AT ALL!  It was really difficult to get anything straight.

So, working one mirror panel at a time, I took the level and placed it directly underneath the piece of tape on the top of the mirror frame.  I made sure that the top of the level was lined up with the bottom of the tape, and then I drew a line with the white crayon along the bottom edge of the level.  I then covered that line with the 1/4″ vinyl tape.

To modernize this mirror wall, she used tape in different sizes to create the look of panels.

I then moved on to draw a vertical line with the crayon in the same way that I drew the horizontal line.  Once that line was drawn, I also covered it with the 1/4″ vinyl tape.

See how to use tape to make a mirror wall or mirrored closet doors look more modern.

I repeated this process for every panel, until each panel had an inner border of 1/4″ vinyl tape.

This full mirror wall got an update with tape! Learn how to modernize a mirror wall or mirrored closet doors in this blog post.

All in, this took me around 3 hours to complete and under $15.  Absolutely worth it – no doubt in my mind.

The Finished Modernized Mirror Wall

I mean, I don’t know about you, but I actually LIKE this mirror wall now!  I don’t even think I’ve tricked myself into thinking it looks good.  I’m pretty sure it actually looks GOOD!  It’s amazing what breaking up those panels did for this thing.

You won't believe how easy it was to modernize this full mirror wall! She used tape to create a modern mirror wall without spending a lot of money.

Plus, with the dark color of the room, having this mirror wall helps bounce some light around and also makes it feel larger than it is.  (It is really tiny!)

Well anyway, let me know what you think of my mirror wall in the comments below.  And if you wouldn’t mind pinning this post to Pinterest or sharing it, I’d appreciate it.  Remember: friends don’t let friends live with mirror walls or mirrored closet doors they don’t like!

If you have a dated mirrored wall or mirrored closet doors, check out this post for an easy way to modernize a mirrored wall or mirrored closet doors!
 

Filed Under: DIY

How to Refinish an Exterior Door the Easy Way with Gel Stain

March 22, 2021 by Bre 116 Comments

blank

Nothing makes as much of a curb appeal impact as a beautiful front door.  If your wood front door has seen better days and needs to be refinished, do not fear! It’s so easy to restain a front door with gel stain, and the best part is that you can refinish it without removing it from the hinges!

My home had a very sad and neglected wood front door.  My husband and I believe that the door is original to the home (built in 1927), and that it had been unloved since that time.

It was dull, scratched, worn and making a very bad first impression.  Not a very welcoming entrance to the home that we’ve put so much time and effort into!  This “before” photo actually makes the door look better than it should.

The BEFORE photo of this wood front door is sad. Learn how to restain a wood door with gel stain and make it look brand new.

Since our door was in such bad shape, we really wanted to replace it with a new, craftsman-style wooden door with windows.  But after researching the cost of replacement doors, we decided that refinishing the door was better for our budget.

This wood door was in very bad shape before she restained it with gel stain.

We weren’t sure if I could get a wooden door that looked THIS bad to look better, but we figured it was worth a shot.  (Spoiler Alert: it TOTALLY WORKED and I’m going to show you how to get the same results!)

This wood front door was in terrible shape before she restained it with gel stain and gave it a brand new look.

After doing a lot of product research, I settled on using gel stain to refinish this wood front door.  Restaining a door with gel stain has a lot of benefits – one of which is that you don’t have to remove the door from the hinges, strip the door prior to restaining, or do any extensive prep work.  The easy way is my way.

What Is Gel Stain?

In case you’re unfamiliar with it, gel stain is different from traditional stain because it does not penetrate the wood.  It sits on top of the wood, much like paint does.

When applied, it has a pudding-like consistency and looks rather opaque.  But when you wipe off the excess gel stain, it has a translucent finish that lets the wood grain show through, just like regular stain does.

Since originally publishing this post, I have used gel stain on LOTS of projects.  I even have a helpful blog post on Helpful Gel Stain Tips and Tricks for a Perfect Finish.  I recommend reading that post after this post to give you even more information about the process of refinishing a door with gel stain.

Can You Restain a Door That’s Already Stained?

Before we jump into the step-by-step process, I want to answer the number one question that I get on this topic: can you stain a door that’s already been stained?

The answer is YES!  You can use gel stain to restain a door that’s already been stained.  That is exactly what I show you how to do in this post.

The key to restaining a previously stained door with gel stain is sanding just enough to remove any protective sealer that’s left on the door.  You don’t need to sand down to bare wood, but you do need to remove that shiny layer of protection before staining again.

Can You Use Gel Stain on Exterior Applications?

Throughout the years, many people have asked me if it’s okay to use gel stain on an exterior door.  Some people have told me their cans of gel stain say the product is for interior use only.

My can of gel stain says nothing about it being for interior use only, and my door’s finish stood up wonderfully! I moved out of this house in 2019 so I haven’t seen it since then, but from 2014 – 2019, my restained door was in excellent condition.

Also, in my new home, I painted the front door to look like wood with gel stain!  This is another exterior use of gel stain that is working out just great.

So, you may be nervous to refinish your front door with gel stain, but I assure you that it’s going to look fantastic!

Supplies Needed to Restain a Wood Door with Gel Stain

These are the supplies I used to refinish my wood front door as shown in this post.  Obviously you can use a different color of gel stain to refinish your door.  Pick a shade that works best for your home!

This post contains affiliate links.  Please read my disclosure policy for more information.

  • General Finishes Gel Stain (as shown in Brown Mahogany)
  • Foam brushes in varying sizes
  • Cheesecloth
  • Spar Urethane in Satin (formulated for exterior finishes)
  • Sandpaper (I used 100 grit)
  • Disposable gloves
  • Painters tape

How to Restain a Wood Front Door with Gel Stain

This is the complete process of how I restained my wood front door with gel stain, and without removing it from the hinges.

STEP ONE: Clean the Door

I washed the door to remove the dirt and grime that had accumulated over the years.  Then I taped off the door knocker and handle set because I couldn’t get them off the door!

STEP TWO: Sand the Door

I lightly sanded some parts of the door, focusing on the areas that still appeared to have some protective finish on them.  Then I used a cloth to remove the dust that appeared during sanding.

VERY IMPORTANT: If your door has protective finish left on the entire thing, make sure to sand the entire door.  You want the surface to be in the same condition on the entire door when you start staining.  This will ensure that the stain looks even.

STEP THREE: Apply Gel Stain to the Door

I followed the directions on the can of gel stain, and I applied stain to a small section of the door with a foam brush.

See how to restain a front door without removing it from the hinges! If you use gel stain, you can restain over a door that's already been stained.

I had a temporary freak out when it appeared to be a really dark, solid color – almost like pudding.  I thought I’d ruined my door.

STEP FOUR: Remove Excess Gel Stain

I used cheesecloth to wipe off the excess gel stain on the area to which I’d recently applied the stain.  Here you can see that stain had been applied to the right side of the door, but not the left.  Look at the difference already!

See how to refinish a wood door with gel stain. You can leave it on the hinges!

I repeated this process until I finished restaining the entire door.  I breathed easy because I hadn’t ruined the door.

Learn how to restain a wood door with gel stain! It is an easy way to refinish a front door, and you don't even remove the door from the hinges.

STEP FIVE – Repeat the Gel Stain Process

I then let it dry overnight, and repeated the gel staining process again.

Learn how to refinish a front door with gel stain.

This is the door with two coats of gel stain, but no protective topcoat yet.  Already beautiful, right?

STEP SIX – Apply Protective Topcoat

After the second coat of gel stain had dried 24 hours, I began applying my protective topcoat, per the manufacturer’s directions.

I applied four coats throughout the course of the day, which allowed me to finish the topcoat portion without sanding in between any of the coats.  This was key to ensuring ease of application.

Several people have asked if I am sure that it’s okay to apply a water-based topcoat over gel stain.  I am totally sure that it is okay to use water-based topcoats on gel stain!  General Finishes (the manufacturer of the gel stain I used to refinish my door), even says it is ok to use water-based topcoats with gel stain.

The Restained Front Door

Can I just say that my wood door is now GLEAMING?

This wood door was refinished with gel stain. Using gel stain is an easy way to restain a front door without removing it.

It looks totally amazing – almost like a new door.

Learn how to restain a front door with gel stain!

This restaining process took some time, but it was time well spent.  Refinishing the door with gel stain made a huge impact on my home’s curb appeal, and it was an inexpensive way to upgrade the look of the door.

Learn how to restain a front door easily - you don't even remove it from the hinges! Using gel stain to refinish a front door makes the process easier and the results are beautiful

Filed Under: DIY

  • « Go to Previous Page
  • Page 1
  • Interim pages omitted …
  • Page 5
  • Page 6
  • Page 7
  • Page 8
  • Page 9
  • Interim pages omitted …
  • Page 14
  • Go to Next Page »

Primary Sidebar

Let’s Connect!

Hi, I’m Bre! Thanks for visiting Average But Inspired, where I show you how to work with what you’ve got to create a home you love.

Bre of Average But Inspired - a DIY and craft blog

Love DIY? Subscribe to Get Posts E-mailed!

How Can I Help You?

blank

7 Tips for Hosting a Party on a Budget

blank

Limewash Stone Fireplace Makeover: Bye Bye Orange Stone Fireplace, Hello Neutral Stone Beauty!

blank

How to Paint a Countertop to Look Like Marble!

blank

My DIY Kitchen Makeover Reveal!

Looking for Something?

Copyright © 2013-2022, Bre Eggert (Average But Inspired). All rights reserved.
  • Home
  • DIY
  • Crafts
  • Home Decor
  • Privacy Policy and Copyright Policy
  • Disclosures
  • Contact Me