• Skip to primary navigation
  • Skip to main content
  • Skip to primary sidebar
Average But Inspired logo - DIY and craft

Average But Inspired

Craft a home you love. DIY and craft tutorials.

  • About
    • Contact Me
    • Disclosures
    • Privacy Policy and Copyright Policy
  • DIY
    • Furniture
  • Crafts
    • Dollar Store Crafts
    • Seasonal
      • Patriotic & Summer
      • Valentine’s Day
      • Easter & Spring
      • Fall & Halloween
      • Christmas & Winter
  • Home Decor
    • Organization
  • Shop
    • DIY Swag
    • DIY Guides
  • Home

Christmas

How to Make a Dollar Store Christmas Cloche

November 15, 2017 by Bre 2 Comments

Make a charming DIY Christmas Cloche with Dollar Tree supplies!

I hope you all will forgive me for posting about Christmas before Thanksgiving, but listen . . . if you’re going to do any Christmas crafts, now’s the time to get started! 

So here we go – my first Christmas-related post of the season . . . and it’s a cute one!  Run over to Dollar Tree to pick up the essential supplies for this project and get to work making a beautiful Dollar Store Christmas Cloche for your Christmas decor!  

Christmas cloches filled with holiday miniatures have been a Pinterest staple for years, but this simple version is probably the most budget-friendly one around!

Transform a dollar store ornament and other supplies into a pretty Christmas Cloche for your DIY Christmas decor! #dollarstore #dollartree #Christmasdecor

Supplies Needed to Make a Dollar Store Christmas Cloche

Some of these are affiliate links.  Please read my disclosure policy for more information.

  • Dollar Tree cylinder vase
  • Dollar Tree foam discs
  • Dollar Tree miniature church, building, etc.
  • Woodgrain shelf liner
  • Fake snow
  • Spray adhesive
  • Hot glue and hot glue gun
  • Scissors

How to Make a Dollar Tree Christmas Cloche

Guys, this project will take you all of ten minutes to make.  TEN MINUTES!  I promise. 

I whipped this up right before I had to go volunteer at my kids’ school library (I’m getting real friendly with the Dewey Decimal System, friends!) – easiest project ever!

Transform a dollar store ornament and other supplies into a pretty Christmas Cloche for your DIY Christmas decor! #dollarstore #dollartree #Christmasdecor

Begin by spraying one side of the foam disc with spray adhesive.  

Transform a dollar store ornament and other supplies into a pretty Christmas Cloche for your DIY Christmas decor! #dollarstore #dollartree #Christmasdecor

Then press some fake snow onto that disc.  

Transform a dollar store ornament and other supplies into a pretty Christmas Cloche for your DIY Christmas decor! #dollarstore #dollartree #Christmasdecor

Next, cut two strips of 12″ woodgrain scrapbook paper or the woodgrain shelf liner available at Dollar Tree to be a little wider than the edge of your disc. 

(If you happen to have woodgrain paper that is longer than traditional 12″ scrapbook paper, you may only need to cut one strip of paper.)  

Transform a dollar store ornament and other supplies into a pretty Christmas Cloche for your DIY Christmas decor! #dollarstore #dollartree #Christmasdecor

Fire up that hot glue gun and wrap the woodgrain paper around the edge of the foam disc.  Make the top edge of the paper flush with the edge of the foam disc that has the fake snow on it. 

Here Are Other Dollar Tree Christmas DIY Projects You’ll Enjoy!

  • Candy Cane Wreath
  • Large Gift Tag Decor

Then flip the disc over and trim the excess scrapbook paper from around the bottom edge of the foam disc.

(If you used the woodgrain adhesive shelf liner, you won’t need to use the hot glue gun. You could just stick the shelf liner to the foam disc.)

Transform a dollar store ornament and other supplies into a pretty Christmas Cloche for your DIY Christmas decor! #dollarstore #dollartree #Christmasdecor

Hot glue the ornament or miniature building to the foam disc (snowy side), and place the cylinder vase on top. 

That’s all you need to make a cute Christmas Cloche for your holiday decor!  

Transform a dollar store ornament and other supplies into a pretty Christmas Cloche for your DIY Christmas decor! #dollarstore #dollartree #Christmasdecor

I paired my cloche with adorable white ceramic houses.

Transform a dollar store ornament and other supplies into a pretty Christmas Cloche for your DIY Christmas decor! #dollarstore #dollartree #Christmasdecor

I just love the simplicity of these little houses.  (My kids asked me 89348 times if they could paint them.  NO.  No, you may not paint my little white houses!)

Transform a dollar store ornament and other supplies into a pretty Christmas Cloche for your DIY Christmas decor! #dollarstore #dollartree #Christmasdecor

This simple look is perfect for Christmas decor, or to be left out all winter.  Make sure to “pin it” so you’ll remember to make this for your seasonal decor!

Transform a dollar store ornament and other supplies into a pretty Christmas Cloche for your DIY Christmas decor! #dollarstore #dollartree #Christmasdecor

Filed Under: Christmas, Crafts, Dollar Tree, Holiday

How to Transform a Coca-Cola Bottle Into a Christmas Ornament {and Free Printable Gift Tags!}

December 16, 2016 by Bre 2 Comments

blank

This is a sponsored post written by me on behalf of Coca-Cola® and Dollar General.  All opinions are 100% mine.

If you’ve visited my blog before, chances are that you know I have a deep, deep love for Coca-Cola® and Diet Coke®.  In fact, I refer to Diet Coke® as the nectar of the Gods.  It’s pretty much my favorite.

In addition to loving that delicious, bubbly beverage, I also love decorating my Christmas tree with ornaments that have some meaning or special connection to me and/or my family members.  No generic ornaments for our tree!  So when I heard that Dollar General has a special Bottle Cap Topper that turns the Coca-Cola® limited edition holiday bottle into an actual ornament, I knew it would be a great addition for this Diet Coke® lover’s Christmas tree!  And the best part (in my opinion), is that the Bottle Cap Topper and the limited edition holiday Coca-Cola® bottle are FREE with any purchase of two 20 oz. Sprite products at Dollar General!  Learn how to transform a Coca-Cola bottle into an ornament for your Christmas tree! Plus, download free printable gift tags in this post!

Friends, it could NOT be easier to turn this adorable bottle into an ornament!  Literally all you do is press the Bottle Cap Topper onto the bottle cap!  (If you don’t believe me, visit Dollar General’s website to see a video on how to use the Bottle Cap Topper!)Learn how to transform a Coca-Cola bottle into an ornament for your Christmas tree! Plus, download free printable gift tags in this post!

That is super cute on its own . . . but . . . well, you know me.  I kind of like to do things up a bit.  So while I was roaming the aisles of Dollar General, I picked up some extra Christmas decorations to add a little flair to my Coca-Cola® bottle ornaments.  Tinsel ribbon, jingle bells, and sparkly snowflakes . . . perfection.Learn how to transform a Coca-Cola bottle into an ornament for your Christmas tree! Plus, download free printable gift tags in this post!

And then these totally cheesy (but perfectly appropriate for these ornaments) sayings started popping into my head, and I decided to make some cute tags to hang on the ornaments as well.  Learn how to transform a Coca-Cola bottle into an ornament for your Christmas tree! Plus, download free printable gift tags in this post!

These little gift tags are super cute on the Coca-Cola® bottle ornaments if you’re giving them as a gift!  If you’d like a set for yourself, you can download them for free RIGHT HERE!

Once I had all of my supplies ready, I decked out my Coca-Cola® bottle ornaments!  I added tinsel ribbon, a jingle bell, and a gift tag to one, and tinsel ribbon, a snowflake, and a gift tag to the other.  Learn how to transform a Coca-Cola bottle into an ornament for your Christmas tree! Plus, download free printable gift tags in this post!

Learn how to transform a Coca-Cola bottle into an ornament for your Christmas tree! Plus, download free printable gift tags in this post!

They’re so cute!  Learn how to transform a Coca-Cola bottle into an ornament for your Christmas tree! Plus, download free printable gift tags in this post!

And they’re even cuter on the tree!  Learn how to transform a Coca-Cola bottle into an ornament for your Christmas tree! Plus, download free printable gift tags in this post!

This Coca-Cola® lover is happy to have one of her favorite things hanging on the tree – right there for all to see.  Learn how to transform a Coca-Cola bottle into an ornament for your Christmas tree! Plus, download free printable gift tags in this post!

Think about picking some of these up during your next trip to Dollar General.  How cute would they be as part of a teacher’s gift or a neighbor gift?  Any Coca-Cola® connoisseur would appreciate one!  And please “pin” this post to help share this idea!Learn how to transform a Coca-Cola bottle into an ornament for your Christmas tree! Plus, download free printable gift tags in this post!

Wishing you all a Christmas that’s “soda-lightful!”

-Bre

Visit Sponsors Site

Filed Under: Christmas, Holiday

DIY Memorial Ornaments to Remember Loved Ones at Christmas

November 30, 2016 by Bre 43 Comments

blank

Make meaningful Christmas ornaments for departed loved ones using old shirts and a sample of their handwriting.

Usually posts are easy for me to write.  The words flow out of my mind and into the computer with no problem.  But this is not one of those posts.  

This is a hard post.  A sad post.  A missing my dad post.

Learn how to make DIY Memorial Ornaments to help honor and remember loved ones who have passed. This project uses a loved one's old clothes and handwriting to create a Christmas ornament that will be cherished by anyone who is missing their loved one.

Last year my dad passed away after a long battle with brain cancer.  I miss him every single day.  

When I had to help my mom and sister clean out his closet earlier this year, I couldn’t bear to give away all of his things.  So I packed up some of his favorite shirts and brought them home with me.  

I didn’t know exactly what I was going to do with them, but I knew I’d think of something.  And a few months later, in the middle of the night, I did.  

I decided to use some of my dad’s old shirts and his handwriting to make Christmas memorial ornaments for myself and my family.  

I didn’t think that I’d share this project on my blog, but when I saw how much these ornaments meant to my family members, I decided to post the project.  

I know there are others of you out there, just like me, who are missing loved ones every day and especially at the holidays.  So I wanted to share my idea of how you can honor them and remember them with special DIY Memorial Ornaments that you will cherish for the rest of your life.

Supplies Needed to Make DIY Memorial Ornaments

This post contains affiliate links.  Please read my disclosure policy for more information.

  • Clear glass ornaments or clear plastic ornaments
  • Fabric scissors (regular fabric shears or pinking shears)
  • Card stock
  • Scanner or copier
  • Hole punch
  • Metallic tinsel cord

How to Make Memorial Ornaments

First, gather your loved one’s shirts.  You’ll have a good cry at this point.  I guarantee it.  

Once you’ve calmed down and wiped away your tears, cut the shirts into strips.  I cut my dad’s shirts into strips about 1″ wide and about 4 or 5″ long.  

Learn how to make DIY Memorial Ornaments to help honor and remember loved ones who have passed. This project uses a loved one's old clothes and handwriting to create a Christmas ornament that will be cherished by anyone who is missing their loved one.

Next, put the strips of fabric into a clear glass or plastic ornament.  Alternate the patterns or colors as you place them inside so that you get a good variety once the ornament is complete.  

Learn how to make DIY Memorial Ornaments to help honor and remember loved ones who have passed. This project uses a loved one's old clothes and handwriting to create a Christmas ornament that will be cherished by anyone who is missing their loved one.

Now, if you have a card or note from your loved one, this step will help make the ornament even more special.  

I had a note from my dad that he wrote right before he went into surgery.  (I cherish this note!)  

Scan the note or take a picture of it. Then, crop the photo in photo editing software (like the photo software pre-installed on your computer or phone, or the online service PicMonkey), to be the person’s signature, and then save that signature as a new photo.  

Once you have that new photo, print it onto card stock.

Learn how to make DIY Memorial Ornaments to help honor and remember loved ones who have passed. This project uses a loved one's old clothes and handwriting to create a Christmas ornament that will be cherished by anyone who is missing their loved one.

Cut out your loved one’s note, punch a hole in it, and tie it onto the ornament with pretty ribbon or string.  

Learn how to make DIY Memorial Ornaments to help honor and remember loved ones who have passed. This project uses a loved one's old clothes and handwriting to create a Christmas ornament that will be cherished by anyone who is missing their loved one.

And with that, you’ll have a beautiful and personalized ornament to honor your loved one at Christmas and always.  

Learn how to make DIY Memorial Ornaments to help honor and remember loved ones who have passed. This project uses a loved one's old clothes and handwriting to create a Christmas ornament that will be cherished by anyone who is missing their loved one.

If you don’t have a note from your loved one to include their handwriting on the tag, you could make a tag of your own with their name or something else that is meaningful to them and you.  

Learn how to make DIY Memorial Ornaments to help honor and remember loved ones who have passed. This project uses a loved one's old clothes and handwriting to create a Christmas ornament that will be cherished by anyone who is missing their loved one.

I would give anything to have my dad back with me for another Christmas, but at least I have a little something of his with me this holiday.  

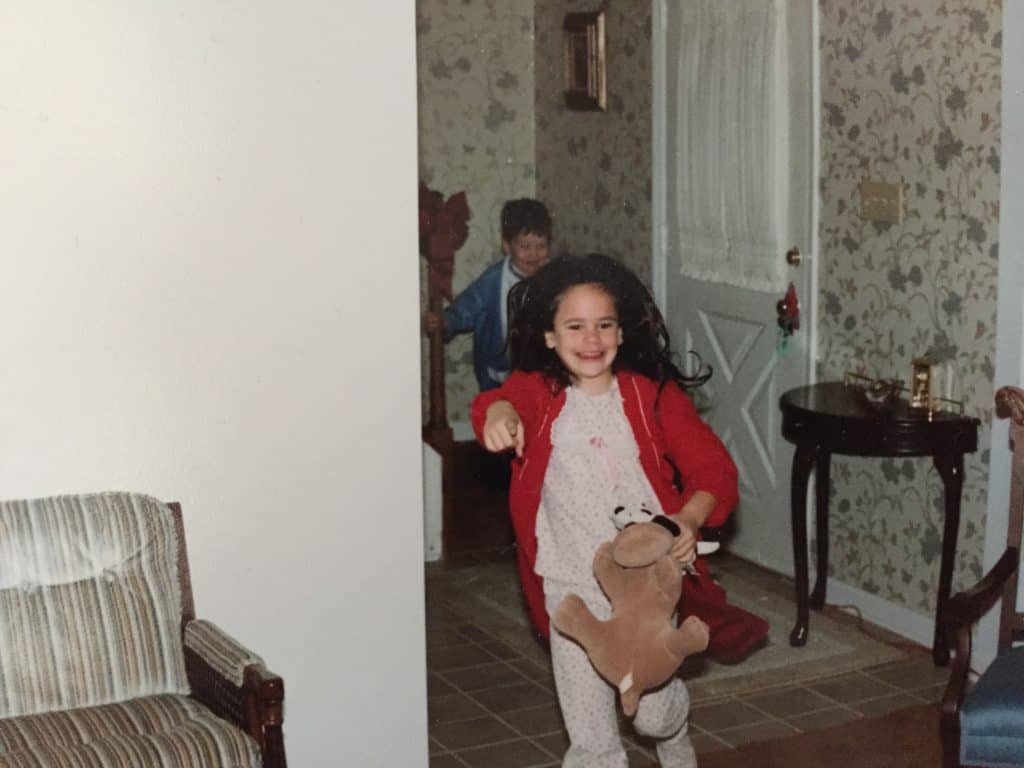
Christmas was always so special with my dad, because every year he was the one who turned on the Christmas music for present opening, handed out the gifts, and maintained the all-important gift wrap trash bag.  

He was the best.  (Here he is with my family on Christmas 1994 or so.). And OK – at least we can all have a good laugh at the clothes and decor now – ohmygosh.

family-christmas-picture-1992

So for those reasons, and countless others, I can tell you that this ornament hangs in a place of honor on my Christmas tree.  It is front and center, and that’s where it always will be.  

Learn how to make DIY Memorial Ornaments to help honor and remember loved ones who have passed. This project uses a loved one's old clothes and handwriting to create a Christmas ornament that will be cherished by anyone who is missing their loved one.

I hope that you’re not missing anyone special this Christmas, but if you are, I hope you know that you’re not alone.  You will get through it.  Peace and love to you at Christmas and always.

Filed Under: Christmas, Holiday

How to Make a Reversible Christmas to Winter Painted Wood Sign

November 22, 2016 by Bre Leave a Comment

blank

One of my favorite things is finding a way to make seasonal decor items multi-season or multi-purpose.  My house doesn’t have a lot of storage space, so I like to try and get as much use out of seasonal decor as I can.  That’s why this painted wood sign that I made, which reverses from Christmas to winter, is so great!  Display the “BELIEVE” side at Christmas . . . It only takes one piece of wood to make two adorable painted wood signs! Learn how to make a DIY reversible Christmas to winter sign with this tutorial.

and then reverse to “LET IT SNOW” come January!  It only takes one piece of wood to make two adorable painted wood signs! Learn how to make a DIY reversible Christmas to winter sign with this tutorial.

You can make one for your own home with any scrap wood you have in your stash, or with a piece of precut plywood from the home improvement or craft store.  Easy!

Supplies Needed to Make a Reversible Painted Wood Sign

Some of the links in this post are affiliate links, which means that I earn a small commission at no added cost to you if you purchase through them.  To read my full disclosure policy, please click here.  Thank you to DecoArt for giving me the paint I used in this project.

  • Wood scrap or unfinished wood sign
  • Americana Decor Chalky Finish Paint in Carbon, Everlasting, Inheritance, Legacy, and Rouge
  • Americana Decor Creme Waxes in Clear and Dark Brown
  • Ruler
  • Pencil
  • Foam Roller
  • Small artist paintbrushes
  • Electronic cutting machine* (If you don’t have a cutting machine, you could use stencils or large letter stickers to achieve this look)
  • Adhesive vinyl* (If you are using the cutting machine you need this)
  • Plastic snowflakes (I got them at Dollar Tree)
  • Hot glue and glue gun

How to Make a Reversible Painted Wood Sign

Using a foam roller, paint a large rectangle in white paint in the middle of the wooden board.  It only takes one piece of wood to make two adorable painted wood signs! Learn how to make a DIY reversible Christmas to winter sign with this tutorial.

Next, use the electronic cutting machine to cut the word “BELIEVE” in a font of your choice. Affix the vinyl stencil to the portion of the painted wooden board and press down firmly along the edges.  If you don’t have a cutting machine, you could use large letter stickers from the craft store for this step, or you could use a stencil.  It only takes one piece of wood to make two adorable painted wood signs! Learn how to make a DIY reversible Christmas to winter sign with this tutorial.

Paint over the entire surface with two coats of red paint and let the sign dry.  Once it is totally dry, remove the vinyl letters (or stickers) to reveal the word BELIEVE.It only takes one piece of wood to make two adorable painted wood signs! Learn how to make a DIY reversible Christmas to winter sign with this tutorial.

Using a pencil, lightly freehand a belt buckle in the middle of the letter “I” and a Santa hat on top of the same letter.  It only takes one piece of wood to make two adorable painted wood signs! Learn how to make a DIY reversible Christmas to winter sign with this tutorial.

Fill in the belt buckle and hat with black, white, and yellow paint.  It only takes one piece of wood to make two adorable painted wood signs! Learn how to make a DIY reversible Christmas to winter sign with this tutorial.

Once dry, flip the wooden board over and paint the entire surface with two coats of blue paint.  It only takes one piece of wood to make two adorable painted wood signs! Learn how to make a DIY reversible Christmas to winter sign with this tutorial.

Using the electronic cutting machine, cut out the phrase “Let it Snow.”  Affix to the wooden board and press down firmly along the edges.  Alternatively, place large letter stickers on the sign to write the phrase.  It only takes one piece of wood to make two adorable painted wood signs! Learn how to make a DIY reversible Christmas to winter sign with this tutorial.

Cover the entire surface in white paint, allowing some of the blue paint underneath to show through. Let dry. Once dry, remove the vinyl to reveal the phrase.  It only takes one piece of wood to make two adorable painted wood signs! Learn how to make a DIY reversible Christmas to winter sign with this tutorial.

Seal both sides of the sign with Creme Wax.  It only takes one piece of wood to make two adorable painted wood signs! Learn how to make a DIY reversible Christmas to winter sign with this tutorial.

Create a faux distressed finish with Creme Wax in Dark brown, if desired.  You can also use the sandpaper to further distress the finish, if desired.It only takes one piece of wood to make two adorable painted wood signs! Learn how to make a DIY reversible Christmas to winter sign with this tutorial.

Once dry, hot glue the snowflakes to the “Let it Snow” side of the sign.  It only takes one piece of wood to make two adorable painted wood signs! Learn how to make a DIY reversible Christmas to winter sign with this tutorial.

This project is really easy but takes a little longer than my typical projects, simply because of the drying time involved!  If you’re short on time, you could always use a hairdryer to speed up the process.  It only takes one piece of wood to make two adorable painted wood signs! Learn how to make a DIY reversible Christmas to winter sign with this tutorial.

It only takes one piece of wood to make two adorable painted wood signs! Learn how to make a DIY reversible Christmas to winter sign with this tutorial.

It’s worth it to spend a little extra time to get some longevity out of this project though!

If you agree and like this sign, I’d love for you to PIN IT!  Thanks!

It only takes one piece of wood to make two adorable painted wood signs! Learn how to make a DIY reversible Christmas to winter sign with this tutorial.

Happy holiday decorating!

-Bre

You May Also Like This DIY Reindeer Specimen Art  DIY Reindeer Specimen Art is an adorable Christmas decor project!

Filed Under: Christmas, Holiday

15 DIY Holiday Gift Ideas for Under $10!

November 16, 2016 by Bre Leave a Comment

blank

Looking for DIY holiday gift ideas or DIY Christmas gifts? Here are homemade gifts you can make for under $10!

Even though it might be too early to start decorating for Christmas (according to some, at least), it’s not too early to start thinking about holiday gift giving!  Especially when you’re planning to include some DIY Christmas gifts or diy gifts in Santa’s sleigh!

There’s always a bit more lead time involved with handmade gifts, but with a little preparation you can make some awesome presents and save a lot of cash – even during the busy holiday season!  

You don't have to spend a fortune to give someone a thoughtful gift! This post has 15 DIY Christmas Gift Ideas that you can make for under $10!

And to help get your DIY gift giving wheels turning, I rounded up some of my favorite DIY Holiday Gift Ideas that I’ve shared over the years, and all of these homemade gifts can be made for $10 or less!  

You can click through to any of the posts for complete project tutorials and supply lists!

Wearable Handmade Christmas Gifts

If you’re looking for a homemade Christmas gift idea that the recipient can wear, look no further! Here are some easy-to-make wearable Christmas gifts anyone would love.

Fabric Tape Bangle Bracelets

Make a cute set of bangle bracelets for any fashion obsessed lady on your list. Craft paint and fabric tape are all you need for this lovely homemade gift.

Paint and fabric tape are all you need to make adorable fabric tape bangle bracelets!

Upcycled Shirt Tote Bag

No sewing skills or sewing machine needed to make a cute fabric tote bag that works for trips to the library, to carry groceries, and more!  Customize with any shape or design to create a personalized gift any lady would be happy to have.

No sewing skills needed to make a cute fabric tote bag! This is a great gift idea.

Painted Leather Bracelets

Personalize plain leather bracelets with words or patterns and create a pretty and unique gift! You can purchase unfinished leather bracelets at any craft store. Multi-surface paint lets you dress them up however you like!

Use Americana Multi-Surface Paint to customize leather cuff bracelets any way you want!

Air Dry Clay Keychains

Air dry clay is so much fun and can be used to make these adorable keychains! Stamping and embossing tools give air dry clay a decorative touch.

Air dry clay keychains are a fun and simple craft that anyone can make! Plus, they make a great DIY gift!

Handmade Holiday Gifts for the Home

If you’re giving a gift to a homebody or decor-lover, handmade home decor is always a great idea!

DIY Photo Cube

A dollar store wood block becomes the perfect photo cube in minutes! Add a cute photo of you and the recipient, and you have a lovely (and inexpensive) DIY Christmas gift!

A DIY photo cube is a wonderful handmade Christmas gift idea.

Charming and Rustic “Hello” Sign

A sweet little sign is a perfect gift for a homebody or new homeowner.  Learn how to make a sign like this right in this post!

Learn how to make a cute "hello" sign to greet guests! This is a great DIY gift idea or housewarming gift.

10 Minute DIY Slate Coasters

Wrap these DIY Slate Coasters with pretty ribbon and you have a fantastic holiday hostess gift!

These DIY slate coasters are a wonderful DIY gift idea! Get the full tutorial on how to make your own coasters in this post.

Marbled Nail Polish Ornaments

Ornaments are always a great standalone gift, or a pretty wrapping paper accent.  Use dollar store nail polish and plain ceramic ornaments to make these!

Nail polish from the dollar store and plain ceramic ornaments become beautiful marbled ornaments! Give them as a pretty DIY Holiday Gift this year!

Wood Plaque Picture Frames

Pretty paint, scrapbook paper, and wood plaques are turned into adorable picture frames in this project! Customize with paper and paint that the recipient will love!

Love this quick and easy project! Turn wooden plaques from the craft store into adorable picture frames with scrapbook paper and paint. Get the full tutorial at averageinspired.com.

Newspaper Flower Pots

Decoupage a flower pot with newspaper, pop in a succulent, and you have an adorable little gift! Or, for a Christmas twist, plant a mini Christmas tree!

These little newspaper pots are so charming! They make a cute gift, too!

Etched Glass Votive Holders

Etched glass gifts are SO easy to make!  Follow this tutorial to learn how to etch just about any glass surface!

DIY etched glass votives are such a GREAT gift! They're easy to make and inexpensive. Get the full tutorial here.

Peg Doll Family Art

Paint wooden peg dolls to resemble the recipient’s family, and you’ll have an adorable and meaningful gift!

Personalize plain peg dolls to resemble your family in this fun craft!

Boutique-Style Picture Frame

Frames are always a good gift – especially when they’re pretty!  Upcycle thrift store frames with this fun gift idea!

Update a thrift shop picture frame with paint and plywood! Learn how to make a boutique-style picture frame with this simple tutorial.

Functional DIY Christmas Gift Ideas

Not a fashionista or decor lover? That’s ok! Here are some practical handmade gift ideas!

DIY Christmas Stovetop Potpourri Kit

Make a holiday simmer pot kit with dried or fresh ingredients! These lovely kits help a neighbor or friend make their home smell lovely during the holidays.

Make a DIY Christmas simmer pot gift jar for neighbors or friends!

Personalized Hostess Gift Basket

If you have a Cricut or Silhouette cutting machine, personalize some dollar store items and put together an adorable gift basket! This is a great hostess gift at Christmastime (or anytime)!

A DIY Christmas hostess gift can be made with dollar store items and a Cricut machine. Adding personalization brings this DIY gift basket together.

No-Sew Coffee Sleeves

You don’t have to use any sewing skills to make these cute coffee sleeves! Craft felt and glue are the primary supplies!

No-Sew Coffee Sleeves are a fun and easy DIY holiday gift!

So, which of these DIY Christmas gift ideas will you be making this year? Let me know in the comments below. Happy holiday gift crafting!

This post has so many DIY Christmas Gifts for under $10! Handmade holiday gifts can be so special to give and receive, so get these great DIY gift ideas in this post.

Filed Under: Christmas, Holiday

How to Make a Faux Pallet Wood Advent Calendar

November 9, 2016 by Bre 10 Comments

blank

Whew – it’s the second Wednesday of the month AGAIN!  That’s means it’s time for the Monthly DIY Challenge, when some of my favorite blogger friends and I team up to create projects that are based around common items or themes.  In the past we’ve done things like Sharpies and ModPodge, and this month we’re all creating items out of reclaimed wood (and I cannot wait to show you my faux pallet wood advent calendar!).  You’ll find links to all of the projects at the bottom of this post, but first, here’s a little teaser.  See ten amazing projects you can make with reclaimed wood! As part of the Monthly DIY Challenge you'll find these great wood project tutorials.

So guys, I’m not gonna lie to you.  I had a little problem with this challenge.  You see, we had to use reclaimed wood and I just do not have any reclaimed wood lying around, nor do I have easy access to any.  I live two blocks from Chicago, people!  We have a significant shortage of barns and rustic things in general.  Anyway, I had planned to hit up a salvage shop to buy some for this project, but the proverbial sh** hit the fan in my life, and that did not happen.

Not being one to give up on a challenge, however, I decided to try and make NEW wood look like reclaimed wood, so that’s what I’m using – fake reclaimed wood that I’ve turned into a Faux Pallet Wood Advent Calendar!
Learn how to make an adorable and rustic DIY Advent Calendar or Christmas Countdown Calendar. This tutorial teaches you how to make this simple advent calendar for your holiday celebration.

If you have reclaimed wood lying around, you can definitely use that for this project!  Or, you can use my method of turning new wood into wood that looks old, and make this rustic advent calendar.

Supplies Needed to Make a Faux Pallet Wood Advent Calendar

Some of these links are affiliate links, which means that I earn a small commission at no added cost to you, if you purchase through them.  To read my full disclosure policy, please click here.

  • Craft pallet wood sign
  • Amy Howard Vintage Wood “Better With Age” Salvaged Timber
  • Sandpaper
  • Chip brushes
  • Acrylic paints in gray, white, dark green, light green, brown, yellow, and gold
  • Christmas Countdown set (I got mine at Michaels but couldn’t find this set online)
  • Small eye hooks

How to Make a Faux Pallet Wood Advent Calendar

To make this project fit with the theme of this month’s Monthly DIY Challenge, I had to make my NEW wood look OLD!  Thankfully, the generous folks at Amy Howard at Home had given me a container of Vintage Wood “Better With Age” in my swag bag from the Haven Conference, so I decided to get it out and give it a try.  Learn how to make new wood look old! This tutorial shows you how to age new wood almost instantaneously to get a reclaimed wood look in no time!

I followed the instructions and brushed it on, leaving enough time to dry.    Learn how to make new wood look old! This tutorial shows you how to age new wood almost instantaneously to get a reclaimed wood look in no time!

By the time I’d returned from my son’s gymnastics class, my new wood pallet definitely looked aged and old!  There were gorgeously weathered gray highlights all over!Learn how to make new wood look old! This tutorial shows you how to age new wood almost instantaneously to get a reclaimed wood look in no time!

I took my pallet downstairs and beat it up a little bit with a hammer.  Then I mixed up some gray and white acrylic paint with some water, and brushed it on to give the wood an even more weathered look.  Learn how to make new wood look old! This tutorial shows you how to age new wood almost instantaneously to get a reclaimed wood look in no time!

Once all was said and done, my faux pallet wood looked like this.  Learn how to make new wood look old! This tutorial shows you how to age new wood almost instantaneously to get a reclaimed wood look in no time!

So as you can see, I did my best to get the reclaimed wood look when all I had to work with was new wood!  Next up, I painted a Christmas tree onto the wood with a mixture of green acrylic paint.  I added a little stump and a star on top for good measure.  Learn how to make an adorable and rustic DIY Advent Calendar or Christmas Countdown Calendar. This tutorial teaches you how to make this simple advent calendar for your holiday celebration.

After the paint dried, I sanded it down a bit to give it a more rustic look.  Next, I screwed some eye hooks onto the edges of the tree.  Learn how to make an adorable and rustic DIY Advent Calendar or Christmas Countdown Calendar. This tutorial teaches you how to make this simple advent calendar for your holiday celebration.

Then I opened up my Christmas Countdown set and tied the red and white twine through the hooks to make it look like the tree had garland.  Learn how to make an adorable and rustic DIY Advent Calendar or Christmas Countdown Calendar. This tutorial teaches you how to make this simple advent calendar for your holiday celebration.

Learn how to make an adorable and rustic DIY Advent Calendar or Christmas Countdown Calendar. This tutorial teaches you how to make this simple advent calendar for your holiday celebration.

And then my Faux Pallet Wood Advent Calendar was ready to be displayed.  Learn how to make an adorable and rustic DIY Advent Calendar or Christmas Countdown Calendar. This tutorial teaches you how to make this simple advent calendar for your holiday celebration.

Now don’t worry.  I know it’s early November.  I put my advent calendar away after I took these photos.  Learn how to make an adorable and rustic DIY Advent Calendar or Christmas Countdown Calendar. This tutorial teaches you how to make this simple advent calendar for your holiday celebration.

And my mother-in-law already said she wants it, so I won’t even be putting it back out again in my own home.  Learn how to make an adorable and rustic DIY Advent Calendar or Christmas Countdown Calendar. This tutorial teaches you how to make this simple advent calendar for your holiday celebration.

But that’s OK.  My husband says we have enough “Christmas Clutter” as it is.  (And I hate to admit it, but he’s probably right.)  Learn how to make an adorable and rustic DIY Advent Calendar or Christmas Countdown Calendar. This tutorial teaches you how to make this simple advent calendar for your holiday celebration.

But making this project did make me excited for the upcoming season, so I will be looking forward to decorating soon and counting down the days until Santa arrives!

If you liked this post, I’d love for you to “pin” it so share the love!  Learn how to make an adorable and rustic DIY Advent Calendar or Christmas Countdown Calendar. This tutorial teaches you how to make this simple advent calendar for your holiday celebration.

Learn how to make new wood look old! This tutorial shows you how to age new wood almost instantaneously to get a reclaimed wood look in no time!

And don’t forget to visit my friends to see what amazing things they created with ACTUAL reclaimed wood!  I know they’d love to have you check out their projects!

Filed Under: Christmas, Holiday

  • « Go to Previous Page
  • Page 1
  • Page 2
  • Page 3
  • Page 4
  • Page 5
  • Page 6
  • Go to Next Page »

Primary Sidebar

Let’s Connect!

Hi, I’m Bre! Thanks for visiting Average But Inspired, where I show you how to work with what you’ve got to create a home you love.

Bre of Average But Inspired - a DIY and craft blog

Love DIY? Subscribe to Get Posts E-mailed!

How Can I Help You?

blank

How to Paint a Door to Look Like Wood (It’s Easier Than You Think!)

blank

How to Paint a Countertop to Look Like Marble!

blank

How to Create a Faux Antique Brass Finish with Paint

blank

7 Tips for Hosting a Party on a Budget

Looking for Something?

Copyright © 2013-2022, Bre Eggert (Average But Inspired). All rights reserved.
  • Home
  • DIY
  • Crafts
  • Home Decor
  • Privacy Policy and Copyright Policy
  • Disclosures
  • Contact Me